Advanced Platform Development with Kubernetes
Enabling Data Management, the Internet of Things, Blockchain, and Machine Learning
I’ve been distracted for over a year now, writing a (~500 page) end-to-end tutorial on constructing data-centric platforms with Kubernetes. The book is titled “Advanced Platform Development with Kubernetes: Enabling Data Management, the Internet of Things, Blockchain, and Machine Learning”
A little more than a year ago, Apress reached out and asked if I would write a book on Kubernetes for them, mirroring the wide range of projects I develop (and write about) for my clients. I have been building data-centric platforms for almost twenty years, spanning everything from my early days on the aggregation of massive volumes of international log files for Disney to fan-driven location data for Nine Inch Nails. And in the last decade, retailers with point-of-sale, logistics, and inventory systems, marketers leveraging social media metrics, fleet operators with demanding telematics platforms, and manufacturers with advanced IIoT (industrial internet of things) networks.
Linear Algebra: Matrices 1
Linear Algebra Crash Course for Programmers Part 2a
This article on matrices is part two of an ongoing crash course on programming with linear algebra, demonstrating concepts and implementations in Python. The following examples will demonstrate some of the various mathematical notations and their corresponding implementations, easily translatable to any programming language with mature math libraries.
This series began with Linear Algebra: Vectors Crash Course for Python Programmers Part 1. Vectors are the building blocks of matrices, and a good foundational understanding of vectors is essential to understanding matrices.
Kafka on Kubernetes
Deploy a highly available Kafka cluster on Kubernetes.
Kafka is a fast, horizontally scalable, fault-tolerant, message queue service. Kafka is used for building real-time data pipelines and streaming apps.
There are a few Helm based installers out there including the official Kubernetes incubator/kafka. However, in this article, I walk through applying a surprisingly small set of Kubernetes configuration files needed to stand up high performance, highly available Kafka. Manually applying Kubernetes configurations gives you a step-by-step understanding of the system you are deploying and limitless opportunities to customize.
Ethereum Ethstats
Learning the Ethereum Blockchain through its metrics.
The eth-netstats project provides a great dashboard interface for monitoring the status of an Ethereum Blockchain from the perspective of its nodes. The website https://ethstats.net/ reports statistics from an extensive list of Ethereum nodes on the public Ethereum Blockchain, however, the eth-netstats software that drives https://ethstats.net/ can also be used to monitor a Private Ethereum Blockchchain as I demonstrate in the previous article Deploy a Private Ethereum Blockchain on a Custom Kubernetes Cluster.
The eth-netstats service consumes Ethereum statistical metrics provided by individual Ethereum nodes. Check out the documentation on Geth if you are interested in running an Ethereum miner or transaction only node and pointing it’s statistical output to an eth-netstats instance.
Ethereum Blockchain on Kubernetes
Deploy a Private Ethereum Blockchain on a Custom Kubernetes Cluster.
Blockchain technologies have been made famous by Cryptocurrencies such as Bitcoin and Ethereum. However, the concepts behind Blockchain are far more reaching than their support for cryptocurrency. Blockchain technologies now support any digital asset, from signal data to complex messaging, to the execution of business logic through code. Blockchain technologies are rapidly forming a new decentralized internet of transactions.
Kubernetes is an efficient and productive platform for the configuration, deployment, and management of private blockchains. Blockchain technology is intended to provide a decentralized transaction ledger, making it a perfect fit for the distributed nature of Kubernetes Pod deployments. The Kubernetes network infrastructure provides the necessary elements for security, scalability and fault tolerance needed for private or protected Blockchains.
Kubernetes Port Forwarding for Local Development
Using kubefwd
kubefwd helps to enable a seamless and efficient way to develop applications and services on a local workstation. Locally develop applications that intend to interact with other services in a Kubernetes cluster. kubefwd allows applications with connection strings like http://elasticsearch:9200/ or tcp://db:3306 to communicate into the remote cluster. kubefwd can be used to reduce or eliminate the need for local environment specific connection configurations.
Developing services in a Microservices architecture presents local development challenges, especially when the service you are developing needs to interact with a mixture of other services. Microservices, like any other applications are rarely ever self-contained and often need access to databases, authentication services, and other public or private APIs. Loosely-coupled applications still have couplings, they happen on a higher layer of the application stack and often through TCP networking.
FaaS on Kubernetes
Kubeless, Python and Elasticsearch
FaaS or Function as a Service also known as Serverless computing implementations are gaining popularity. Discussed often are the cost savings and each implementations relationship to the physical and network architecture of a specific platform or vendor. While many of the cost and infrastructure advantages of FaaS are compelling, its only one of many advantages. Below, I hope to demonstrate how easy it is to develop and deploy FaaS components into a custom Kubernetes cluster. The functions I develop are nearly all business logic, and I believe therein lies the advantage, high-density business logic. Functions can have a higher degree of focus directly on business logic and communication with other services. Functions can communicate with other functions, microservices or monoliths. In this article, I demonstrate this with Elasticsearch.
Elasticsearch Essential Queries
Getting started with Elasticsearch
The following is an overview for querying Elasticsearch. Over the years I have tried to assemble developer notes for myself and my team on a variety of platforms, languages and frameworks, a type of cheat-sheet but with context, not a comprehensive how-to, but a decent 15-minute overview of the features we are most likely to implement in a given iteration.
Explore the Elasticsearch official documentation: Search in Depth.
Motivation
My team and I work with a lot of SQL-based data, from MySQL, SQLite and even our large Cassandra cluster, however, our reporting systems are built on Elasticsearch. Transitioning our thinking from SQL to the Lucene syntax on occasion requires hitting the docs. However, most technical documentation is either for getting started or gives you every variation of every feature, which is great when you are neck deep and need a specific problem solved.
Remote Query Elasticsearch on Kubernetes
Local workstation-based microservices development
Developing on our local workstations has always been a conceptual challenge for my team when it comes to remote data access. Local workstation-based development of services that intend to connect to a wide range of remote services that may have no options for external connections poses a challenge. Mirroring the entire development environment is possible in many cases, just not practical.
In days before Kubernetes, writing code in IDEs on our local workstation meant we had only a few options for developing server-side-API-style services that needed to connect to a database. We could set up a database server on our local workstation manually or use packages like MAMP/WAMP, or run big virtual servers managed with Vagrant. Even after we got the database running, we needed a good set of data to work with, and that often meant asking a DBA or Sysadmin for SQL dumps from an environment in which we have no access.
Kibana on Kubernetes
Visualize your Elasticsearch data.
This guide walks through a process for setting up Kibana within a namespace on a Kubernetes cluster. If you followed along with Production Grade Elasticsearch on Kubernetes then aside from personal or corporate preferences, little modifications are necessary for the configurations below.
Project Namespace
I use the-project as a namespace for all my examples and testing. Kubernetes Namespaces are the main delimiter I use for security and organization. Configuration files are organized by project, and in Kubernetes, these projects are separated by namespace; therefore I always include a namespace configuration. There is no harm in asking Kubernetes to create a namespace that already exists; an error is returned confirming its existence.
Production Grade Elasticsearch on Kubernetes
Setup a fast, custom production grade Elasticsearch cluster.
Installing production ready, Elasticsearch 6.2 on Kubernetes requires a hand full of simple configurations. The following guide is a high-level overview of an installation process using Elastic’s recommendations for best practices. The Github project kubernetes-elasticsearch-cluster is used for the Elastic Docker container and built to operate Elasticsearch with nodes dedicated as Master, Data, and Client/Ingest.
The Docker container docker-elasticsearch, a “Ready to use, lean and highly configurable Elasticsearch container image.” by pires is sufficient for use in this guide. However, the txn2/k8s-es wraps it with a few minor preset environment variables to simplify configuration. I use the docker image txn2/k8s-es:v6.2.3 in the examples below.
Kubernetes Team Access - RBAC for developers and QA
Role Based Access Control
RBAC (Role Based Access Control) allows our Kubernetes clusters to provide the development team better visibility and access into the development, staging and production environments than it has have ever had in the past. Developers using the command line tool kubectl, can explore the network topology of running microservices, tail live server logs, proxy local ports directly to services or even execute shells into running pods.
Kubernetes and GitlabCI are the central components of our DevOps toolchain and have increased our productivity by many multiples over the traditional approaches of the past.
Python Data Essentials - Matplotlib and Seaborn
A beginners guide.
There is an overwhelming number of options for developers needing to provide data visualization. The most popular library for data visualization in Python is Matplotlib, and built directly on top of Matplotlib is Seaborn. The Seaborn library is “tightly integrated with the PyData stack, including support for numpy and pandas data structures and statistical routines from scipy and statsmodels.”
This article is only intended to get you started with Matplotlib and Seaborn. Both libraries have extensive and mature documentation.
A Microservices Workflow with Golang and Gitlab CI
Continuous Integration & Deployment
Many of the resources on Cloud Native Microservices show you how easy it is to get up and running with AWS or GKE. I think this is great but for the fact that I see a trend (in my clients at least) of associating concepts with particular products or worse, companies. I love Amazon, but it’s not THE cloud). In my opinion, to embrace Cloud Native and Microservices you should develop some, and host them yourself. The cloud is not Google or Amazon; it’s any cluster of virtualized systems, abstracted from their hardware interfaces and centrally managed.
Python Data Essentials - Pandas
A data type equivalent to super-charged spreadsheets.
Pandas bring Python a data type equivalent to super-charged spreadsheets. Pandas add two highly expressive data structures to Python, Series and DataFrame. Pandas Series and DataFrames provide a performant analysis and manipulation of “relational” or “labeled” data similar to relational database tables like MySQL or the rows and columns of Excel. Pandas are great for working with time series data as well as arbitrary matrix data, and unlabeled data.
Pandas leverage NumPy and if you are not familiar with this fundamental library for working with numbers, then I suggest you take a look at Python Data Essentials - NumPy to get a decent footing.
Python Data Essentials - Numpy
Powerful N-dimensional array objects.
Python is one of The Most Popular Languages for Data Science, and because of this adoption by the data science community, we have libraries like NumPy, Pandas and Matplotlib. NumPy at it’s core provides a powerful N-dimensional array objects in which we can perform linear algebra, Pandas give us data structures and data analysis tools, similar to working with a specialized database or powerful spreadsheets and finally Matplotlib to generate plots, histograms, power spectra, bar charts, error charts and scatterplots to name a few.
Reverse Proxy in Golang
Retrofit security proxy to prevent XSS and code injection.
Reverse proxies are standard components in many web architectures, from Nginx in front of php-fpm serving Drupal or Wordpress, to endless mixtures of load balancers, security appliances, and popular firewall applications. Reverse proxies differ from forward proxies in little but their intended implementation, be it service-side or client side. The following information is useful in either context. However, I focus on a service-side architecture. Further down this article, I’ll be going over the reasonably simple go code needed to develop a basic, yet production quality proxy, but first I’ll give you my take on why they solve so many problems and offer up my little workhorse, n2proxy.
Golang to Jupyter
Golang with Jupyter Notebooks
Jupyter Notbooks have been a popular technology in the Python data science community for a while now, especially in academics. Jupyter Notebooks are a way to mix inline, executable code with documentation in a presentation format. Best practices in organizing source code are not always the most efficient at communicating it’s functionality to a user.
While the intention of a programming language is the abstraction of computational complexity into a simplified language humans can read and write, they must always weigh toward the efficiency of the primary interpreter, the computer. Jupyter Notebooks are intended to communicate source code to humans first and computers second. We can use Jupyter Notebooks to communicate to humans not only the source but the interpreted result.
Essential Python 3
Programming in Python
This article is a quick tour of basic Python 3 syntax, components and structure. I intend to balance a cheat sheet format with hello world style boilerplate. If you are already a software developer and need a quick refresh on Python then I hope you benefit from my notes below.
I am a professional software developer for a software development company, and for that reason, I work with a lot of languages, expert in some, and ok in others. I context switch often, and sometimes months in between languages. I often find myself just needing a quick overview to prime the pump so to say, and rather than keep my notes to myself I thought I would clean them up a bit and publish for anyone needing a quick tour, starting with Python and more languages as time and interest permits.
CORS on Kubernetes Ingress Nginx
Painless CORS header configuration in Kubernetes
Using ingress-nginx on Kubernetes makes adding CORS headers painless. Kubernetes ingress-nginx uses annotations as a quick way to allow you to specify the automatic generation of an extensive list of common nginx configuration options.
Example ingress configuration enabling CORS:
apiVersion: extensions/v1beta1
kind: Ingress
metadata:
  name: api
  namespace: fuse
  labels:
    app: api
  annotations:
    nginx.ingress.kubernetes.io/enable-cors: "true"
    nginx.ingress.kubernetes.io/cors-allow-methods: "PUT, GET, POST, OPTIONS"
    nginx.ingress.kubernetes.io/cors-allow-origin: "https://admin.example.com"
    nginx.ingress.kubernetes.io/cors-allow-credentials: "true"
spec:
  rules:
  - host: api.example.com
    http:
      paths:
      - backend:
          serviceName: api-example
          servicePort: 80
        path: /api
  tls:
  - hosts:
    - api.example.com
    secretName: example-tls
You can check the nginx configuration file generated by Kubernetes ingress-nginx on any of the ingress controller pods.
Basic Auth on Kubernetes Ingress
Basic Auth is supported by nearly every major web client, library, and utility.
Basic Auth is one of the oldest and easiest ways to secure a web page or API endpoint. Basic Auth does not have many features and lacks the sophistication of more modern access controls (see Ingress Nginx Auth Examples). However, Basic Auth is supported by nearly every major web client, library, and utility. Basic Auth is secure, stable and perfect for quick security on Kubernetes projects. Basic Auth can easily we swapped out later as requirements demand or provide a foundation for implementations such as OAuth 2 and JWT.
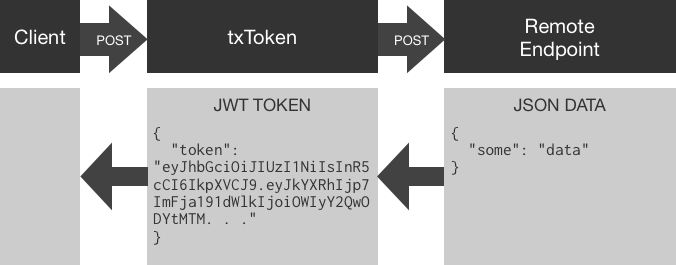
JWT Microservice, Tokenize Remote APIs
Using txToken to create JWT Tokens from JSON POST data.
txToken is a small high performance microservice utility container. txToken is used for adding JSON Web Token based security to existing or new API development. txToken is specifically for systems that communicate in JSON over HTTP. txToken is called from a client with a JSON post body and passes received JSON to a remote endpoint. JSON retrieved from a remote endpoint is used to create a JWT token with an HS256 symmetrically encrypted signature.
Overview
Let's Encrypt, Kubernetes
Automated, secure and free 443/https with signed x509 certificates for Ingress.
Use cert-manager to get port 443/https running with signed x509 certificates for Ingress on your Kubernetes Production Hobby Cluster. cert-manager is the successor to kube-lego and the preferred way to “automatically obtain browser-trusted certificates, without any human intervention.” using Let’s Encrypt.
You need to install Helm first if you do not already have it. Otherwise, check out my article Helm on Custom Kubernetes, especially if you are following along with my Production Hobby Cluster guides.
Install cert-manager
helm install --name cert-manager --namespace kube-system stable/cert-manager
After Helm installs cert-manager you end up with a ServiceAccount ClusterRole, ClusterRoleBinding, Deployment and a couple of Pods named cert-manager-cert-manager in the kube-system namespace. Helm additionaly installs three CustomResourceDefinitions for cert-manager (custom resources are not namespaced):
FEATURED TAGS
ABOUT ME

I lead a talented team of software development and creative engineers, covering many industries looking to collect, analyze, move, buffer, queue, process and present data in significant ways. My expertise and that of my team revolve around microservices, artificial intelligence, algorithms, and machine learning.